
Your PHONE PLUS system can be easily installed in just three simple steps.
")


Please refer to the back of the Install Guide document included with your PHONE PLUS equipment.
If “Option 2” is circled, scroll down this page to Install Option 2.
1. Connecting Your PHONE PLUS Base to the Internet [Video]
Let’s start by unpacking your PHONE PLUS system. This brief video will help you identify all the equipment you should have recieved, including the Yealink W60B Interface Base, which connects to the internet through your router.
Now that you’ve identified your Yealink W60B Interface Base, follow the steps in the video below to connect it to the internet.
Confirm your PHONE PLUS system is connected to the internet. Are all three lights on your Yealink W60B Interface Base glowing solid green? If so, your system is now connected to the internet.
Once your base is connected to the internet, you can test the various features of your system.
TESTING YOUR SYSTEM:
On the back of the paper install guide we provided, you’ll find a telephone number. This is the temporary telephone number that we’ve assigned to your PHONE PLUS system.
Follow the steps below to test four different features. Let’s place a test call by dialing the temporary phone number.
-
- Let’s place a test call by dialing the temporary phone number.
Once your call is connected, press “9” to confirm that all of your new Yealink handsets ring.
Answer the incoming call by picking up one of the handsets. - Let’s test the procedure to transfer calls to the UPS 800 number.
While talking with a customer your handset, press “Tran 1-0” and then hang up. Your phone call will be seamlessly transferred to UPS. - Let’s test the procedure to transfer calls to Amazon.
While talking with a customer your handset, press “Tran 2-0” and then hang up. Your phone call will be seamlessly transferred to Amazon. - Let’s test your voicemail.
From your mobile phone, call the test number.
Allow your phones to ring without answering. Your call will be answered by the voicemail system.
Leave yourself a message.
Go to your email and confirm you have received an email from PP.
Double click the audio file in that email to ensure your VMs are arriving via email and are playing properly.
- Let’s place a test call by dialing the temporary phone number.
2. Call Forwarding Your Published Telephone Number
*Please note: A small percentage of stores will not be able to call forward their number using option A. If Option A is unsuccessful, Option B or Option C can be used.
Option A: Use one of your old telephones and confirm you are calling out on line 1.
Enter ‘*72’ and wait three seconds, or listen for a short recorded message, then dial the temporary phone number from the install sheet included in your package.
Be sure to include a ‘1’ then the area code, then the 7 digit temporary number.
You will hear a confirmation tone or a short message confirming your published number is now forwarded (this verification varies by provider).
From a mobile phone, call your published number to assure you are now hearing the PHONE PLUS greeting message, and once again press ‘9’ to assure all three phones are ringing.
If Option A did not work, please proceed to Option B or Option C.
Option B: Call your current dial tone provider directly and ask to manually call-forward your published number to the temporary number.
DO NOT HANG UP until you have tested the number by calling your published number from a mobile phone and are hearing the PHONE PLUS greeting message.
Option C: Log in Through your online account that you have with your current dial tone provider and call forward your main line to the temporary number we provided.
Please make sure to test that call forwarding is complete by calling your main phone number, and making sure you hear the PHONE PLUS CLOUD system’s main greeting.
3. Activating Your System: Port Form Submission
To fully activate your system, please fill out the phone line port request form.
*Please note: It is imperative that you fill this form out immediately. Your phone system will not be fully operational until the form has been completed and submitted.
Additional Information
If you have any questions or need help, please email tech@premiercompanies.com
Enjoy the relief, increased productivity, and improved customer experience with your new PHONE PLUS service.
To learn how to use your new phones, click here.
Install Option 2
1. Connecting Your PHONE PLUS CLOUD System to the Internet [Video]
Let’s start by unpacking your PHONE PLUS system. This brief video will help you identify all the equipment you should have recieved, including the Yealink W60B Interface Base, which connects to the internet through your router.
Now that you’ve identified your Yealink W60B Interface Base, follow the steps in the video below to connect it to the internet.
Confirm your PHONE PLUS system is connected to the internet. Are all three lights on your Yealink W60B Interface Base glowing solid green? If so, your system is now connected to the internet.
TESTING YOUR SYSTEM:
On the back of the paper install guide we provided, you’ll find a telephone number. This is the temporary telephone number that we’ve assigned to your PHONE PLUS system.
Follow the steps below to test four different features. Let’s place a test call by dialing the temporary phone number.
-
- Let’s place a test call by dialing the temporary phone number.
Once your call is connected, press “9” to confirm that all of your new Yealink handsets ring.
Answer the incoming call by picking up one of the handsets. - Let’s test the procedure to transfer calls to the UPS 800 number.
While talking with a customer your handset, press “Tran 1-0” and then hang up. Your phone call will be seamlessly transferred to UPS. - Let’s test the procedure to transfer calls to Amazon.
While talking with a customer your handset, press “Tran 2-0” and then hang up. Your phone call will be seamlessly transferred to Amazon. - Let’s test your voicemail.
From your mobile phone, call the test number.
Allow your phones to ring without answering. Your call will be answered by the voicemail system.
Leave yourself a message.
Go to your email and confirm you have received an email from PP.
Double click the audio file in that email to ensure your VMs are arriving via email and are playing properly.
- Let’s place a test call by dialing the temporary phone number.
2. Call Forwarding Your Published Telephone Number
*Please note: a very small percentage of stores will not be able to call forward their number using option A. If Option A is unsuccessful, Option B or Option C can be used.
Option A: Use one of your old telephones and confirm you are calling out on line 1.
Enter ‘*72’ and wait three seconds, or listen for a short recorded message, then dial the temporary phone number from the install sheet included in your package.
Be sure to include a ‘1’ then the area code, then the 7 digit temporary number.
You will hear a confirmation tone or a short message confirming your published number is now forwarded (this verification varies by provider).
From a mobile phone, call your published number to assure you are now hearing the PHONE PLUS greeting message, and once again press ‘9’ to assure all three phones are ringing.
If Option A did not work, please proceed to Option B or Option C.
Option B: Call your current dial tone provider directly and ask to manually call-forward your published number to the temporary number.
DO NOT HANG UP until you have tested the number by calling your published number from a mobile phone and are hearing the PHONE PLUS greeting message.
Option C: Log in Through your online account that you have with your current dial tone provider and call forward your main line to the temporary number we provided.
Please make sure to test that call forwarding is complete by calling your main phone number, and making sure you hear the PHONE PLUS CLOUD system’s main greeting.
3. Activating Your System: Port Form Submission
To activate your system, please fill out this service and license agreement.
*Please note: It is imperative that you fill this form out now. Your phone system will not be fully operational until Premier Companies has been notified.
Additional Information
If you have any questions or need help, please email tech@premiercompanies.com
Enjoy the relief, increased productivity, and improved customer experience with your new PHONE PLUS service.
To learn how to use your new phones, click here.
Installing Your Desk Phone
1. Connecting Your PHONE PLUS Desk Phone to the Internet [Video]
Now, let’s test your desk phone to see that it’s working properly.
On the paper install guide we provided, you’ll find a telephone number. This is the temporary telephone number that we’ve assigned to your PHONE PLUS system.
Let’s place a test call by dialing that phone number.
Once your call is connected, press “9” to confirm that all three of your new YEALINK handsets ring.
Answer the incoming call by picking up one of the handsets.
Let’s test the feature to transfer calls to the UPS 800# by pressing the “TRAN” button in the lower left corner, then dial “1-0” on the key pad, then press the dash (-) button in the top right corner labeled “transfer”.
Your test call will be seamlessly transferred to UPS.
2. Call Forwarding Your Published Telephone Number
*Please note: a very small percentage of stores will not be able to call forward their number using option A. If Option A is unsuccessful, Option B or Option C can be used.
Option A: Use one of your old telephones and confirm you are calling out on line 1.
Enter ‘*72’ and wait three seconds, or listen for a short recorded message, then dial the temporary phone number from the install sheet included in your package.
Be sure to include a ‘1’ then the area code, then the 7 digit temporary number.
You will hear a confirmation tone or a short message confirming your published number is now forwarded (this verification varies by provider).
From a mobile phone, call your published number to assure you are now hearing the PHONE PLUS greeting message, and once again press ‘9’ to assure all three phones are ringing.
*Please note: a very small percentage will not be able to call forward their number using option A. If Option A was unsuccessful, please move on to either Option B or Option C.
Option B: Call your current dial tone provider directly and ask to manually call-forward your published number to the temporary number.
DO NOT HANG UP until you have tested the number by calling your published number from a mobile phone and are hearing the PHONE PLUS greeting message.
Option C: Log in Through your online account that you have with your current dial tone provider and call forward your main line to the temporary number we provided.
Please make sure to test that call forwarding is complete by calling your main phone number, and making sure you hear the PHONE PLUS CLOUD system’s main greeting.
Please proceed to step 4.
Additional Information
We encourage you to call your published number and listen to all of your new messaging. If any changes are needed, you can notify us by visiting PremierPHONEPLUS.com/PPscripts.
If you have any questions or need help, please email tech@premiercompanies.com
Enjoy the relief, increased productivity, and improved customer experience with your new PHONE PLUS service.
For those using PHONE PLUS FAX efax service with up to 400 page transmissions per month.
If you are not subscribed and would like more information, email Tech@PremierCompanies.com.
SENDING A FAX
- Open a new outgoing email
- In the TO field, enter the fax number (with a 1) @PhonePlusFax.com your TO address should look like this: 12345678900@PhonePlusFax.com
- In the SUBJECT field, enter a subject line that will appear on your fax cover page
- In the BODY of the email include the persons name you are sending TO, along with the persons name the fax is coming FROM. Any additional text in the BODY of the email will appear on the fax cover page
- Attach any documents that need to be included (PDF- .jpg- .dot- EPS- HTML)
- Press SEND
- You’ll receive a “Transmission Successful” email once the fax has reached it’s destination.
Once you email the fax, the content is converted in a server and sent to the receiving fax machine.
Receiving a confirmation typically takes longer than sending from your fax machine.
This may take several minutes.
You’ll want to get your customers email address and email them the confirmation once received.
RECEIVING A FAX
1. All incoming faxes will arrive at your email inbox from PhonePlusFax.
Yealink Handsets
Before starting, we suggest you label the phones as they are assigned to extensions (11, 12, 13)
A. Making an outbound call
Dial the telephone and press the bottom green talk button on the left
B. Answering an incoming call
Press the bottom left talk button (answer)
C. Answer a second call on the same handset
- Press the top left button (answer)
- To hang up press the bottom red hang up button on the right
- To talk with the original call – press the top right button (Unhold)
D. Place a caller on hold
- Press the top right button (options)
- Scroll down to HOLD
- Press the center button to select
- Press the top left button (Resume) to talk again
E. Transfer to another handset extension
- Press the top right button (options)
- Press the top right button a second time (transfer)
- Dial the extension number
- Press the top right button a third time (transfer)
- Your call will be transferred to the other handset
F. Transfer a live caller to UPS 800# or AMAZON 800#
- If you are speaking to a caller who needs to speak with UPS or AMAZON
- Ask them to hold while you get them assistance – then you can transfer their call
- Press the TRAN button in the lower left corner
- Dial 1 0 to transfer to UPS – or 2 0 to transfer to AMAZON
- Press the red hang-up button
- The call will automatically be transferred directly to the UPS 800# or AMAZON 800#
G. Retrieve Voicemail
When callers leave a voicemail message it is sent to your store email as an audio file.
The Sender email address is “Phone.Plus”.
If you do not see these coming to your main mailbox, please check your spam folder.
H. Adjusting Volumes
- Volume while talking to a caller
While in a live conversation press the right circle arrow to increase the volume
press the left circle arrow to lower the volume - Volume of the ringer when a call is coming in
While NOT in a live conversation press the right circle arrow to increase the volume
press the left circle arrow to lower the volume
To add an additional Yealink handset to your current system, you will need to "register" the handset with your current Yealink W60B hub.
- To begin this process, locate the Yealink W60B hub, and hold the wifi button down for ten seconds. One of the green lights will begin blinking.
- Using the new handset, press the top left button that says "Reg". This will register your new handset to the W60B hub.
- Make test calls in and out to ensure the new phone(s) have been registered properly.
Repeat this process if you have multiple handsets to add to your PHONE PLUS system.
To make a replacement Yealink handset work with your current PHONE PLUS system, you will need to "de-register" the missing handset, then "register" your new handset with your Yealink W60B base.
- Gather all current Yealink handsets and look at the screens to determine which handset you are currently missing. You will need to de-register the missing handset.
2. On any of the old, currently working Yealink handsets, press the middle "OK" button to open up the main menu.
3. From the menu, select "Settings."
4. Then select "Registration."
5. Select "De-Register Handset."
6. A prompt will come up asking you for a current PIN. Enter "0000" and click "Done."
7. Toggle until you are on the handset that was lost, and press "Ok" to de-register.
8. Once the missing handset is de-registered from the Yealink W60B hub, locate the hub, and hold the wifi button down for ten seconds until one of the green lights is flashing.
9. On the new Yealink handset, select the top left button that says "Reg." This will register your new handset to the Yealink W60B hub.
10. Make test calls in and out to ensure the new phone(s) have been registered properly.
Repeat this process if you have multiple handsets to replace on your PHONE PLUS system.
Updating Your PHONE PLUS CLOUD Audio Programming
Changing or Adding "Press" Messages
Enter the details for the PHONE PLUS messages you want updated below and press SUBMIT.
We’ll write, record and load your new messages within 4 business days. You’ll receive a confirmation email once your new messages are in place.
There is no cost to you for updating messages related to:
Address change
Hours
Fax number
Notary pricing
Products/Services
Etc.
If you desire to update messages alerting callers about your store being open or closed on holidays, click to learn about our special
PHONE PLUS Holiday Greeting package.
Updating Bank Card Information
Any questions, call (615) 591-3400 x 234 or email Admin@PremierCompanies.com
Thank You!

PHONE PLUS PRODUCTS
The PHONE PLUS system supports both corded and cordless phones and headsets.
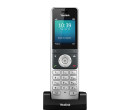
Yealink Cordless Phones | $100
The Yealink 56H handset phones are cordless, up to 2 talk paths, caller ID, speaker phone and a belt clip. The phone comes with a charging cradle. Up to 5 cordless phones can be connected via a single base unit. Talk range is up to 160 feet from the base unit. Charging the phone overnight will hold a charge all day.
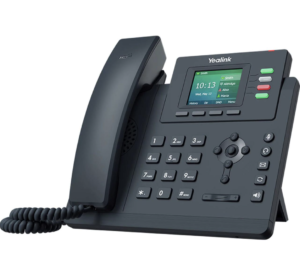
33G Desk Phone | $100
The Yealink 33G desk phone is simple to use. It includes hands free speaker phone, up to 500 contact phone book and up to 4 talk paths. Includes A/C power adapter and ethernet cable.
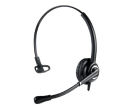
Corded Amtech Headset | $100
Ultra noise cancellation protects callers from potential background distractions. Superb call clarity, a lightweight design, and a comfortable leatherette ear cushion to provide users with the ideal communication experience. Backed by a two-year manufacturer warranty, the AmTech AT612 was designed with the most demanding phone users in mind.
- Monaural headset
- Lightweight design
- Superb receiver audio quality
- Excellent noise cancellation
- Anti acoustic shock circuit
- Flexible microphone boom
- 330° rotatable microphone arm
- 180° rotatable joint of speaker and headband
- 60mm adjustable pliable steel headband
- Quick disconnect for leaving desk without taking off the headset
- Comfortable and reliable for all-day wearing
- Compatible with almost all kinds of phone systems
- CE, FCC, and RoHS certificated
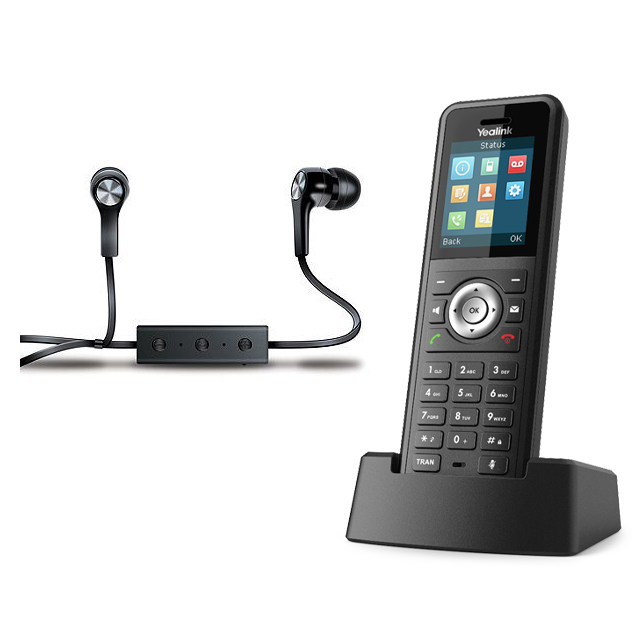
iSound Wireless Headset Paired to Yealink Rugged Handset | $258
iSoundWireless Headset – $39
(Requires pairing with the Yealink Rugged Handset)
Sweat-Proof Bluetooth Earbuds by iSound are comfortable, ergonomic and wirelessly answer calls with the built-in mic. Up to 6 hours of use time. Includes an adjustment clip and silicone tips Bluetooth v2.1 + EDR. Up to 30 foot transmission range, or you can use your favorite bluetooth headset or earbuds.
Yealink Rugged Handset (W59R) Handset – $219
Rugged DECT handset with IP67 protection rating. Scratch resistant, disinfectant resistant. 1.8’’ 128×160 TFT color screen with intuitive user interface. HD voice and FNR (Flexible Noise Reduction). Built-in Bluetooth. Vibration alarm. Alarm functions for occupational safety: push-button alarm, no-movement alarm, mandown alarm and running alarm. Up to 28 hours of talk time (18 hours with Bluetooth headset). Up to 360 hours of standby time (200 hours with Bluetooth headset). Keypad backlight and keypad lock. (Requires a W60B base unit – available at $100 if needed)

Single Message Update | $0
Updating a single message is simple and FREE. This includes your MAIN greeting (non holiday), a Press message, a HOLD PLUS message, or your VOICE MAIL greeting. Email your request to Production@PremierCompanies.com.
We’ll produce and load your new message within days at no cost to you.